
Fill invoice fields from your purchasing system using the PO number
Content Central finds your PO number anywhere on the first page of a vendor's invoice, whatever the layout, then looks that PO up in your purchasing or accounting system and fills in the vendor, terms, and other details as each invoice is captured.
Before you begin
- Your PO numbers follow one fixed format, such as 4500 followed by six digits
- A connection from Content Central to the system that holds your POs, which your IT team may need to set up (see Look up field values from another system)
When you're done, each vendor invoice that shows your PO number is filed with that PO and the details your purchasing system holds for it, such as vendor and terms, filled in automatically. Invoices it can't match wait in the Coding Queue for a person.
Vendors print your PO number in different places, but it always looks the same, for example 4500 followed by six digits. So instead of telling Content Central where to look, you tell it what to look for. It reads the whole first page, picks out the number that matches, and looks that PO up in your system.
Step 1: Add the fields
In your invoice document type, add a PO Number text field, plus a field for each detail you want filled from your system, such as Vendor and Terms (Set up catalogs, fields, and document types). On Vendor, turn on Require entry. That's what sends an invoice to the Coding Queue when its PO isn't found, instead of filing it with blanks.
Step 2: Read the PO number from anywhere on page 1
Go to Administration > Catalogs & Document Types, pick the catalog and the invoice document type, and click the Zonal Recognition tile. Click Add.
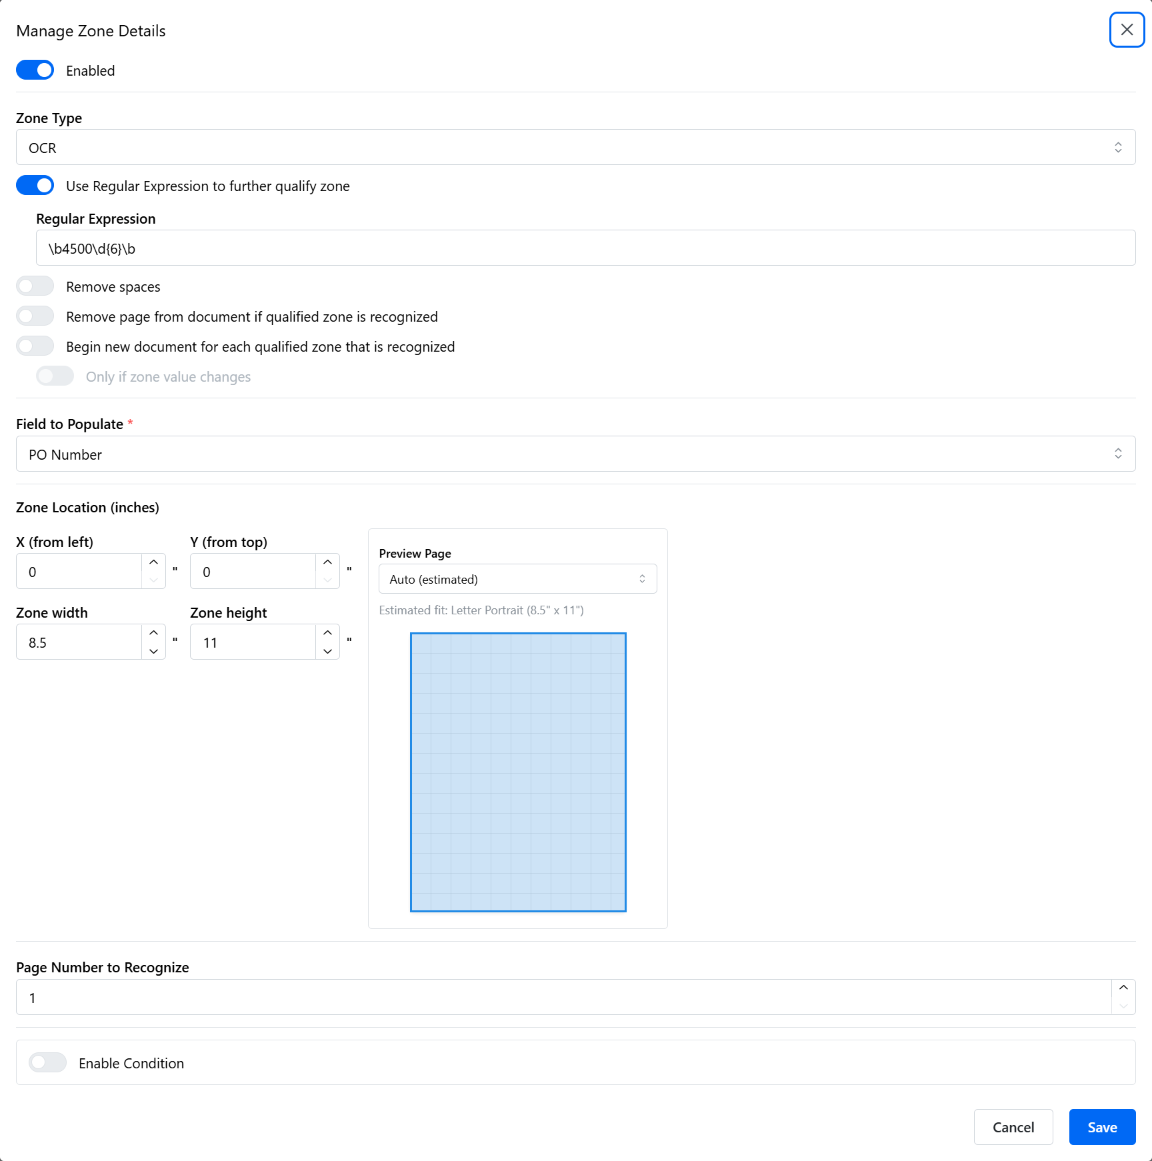
Zone Type:
OCR. Field to Populate:PO Number.
Turn on Use Regular Expression to further qualify zone and type a pattern that matches only your PO numbers. A regular expression is a short text pattern:
\b4500\d{6}\bmeans "4500, then six digits, as a whole number."
Make the zone the whole page: X (from left)
0, Y (from top)0, Zone width8.5, Zone height11. Page Number to Recognize:1.
Click Save, then Save Changes on the zone list.
Step 3: Look the PO up in your system
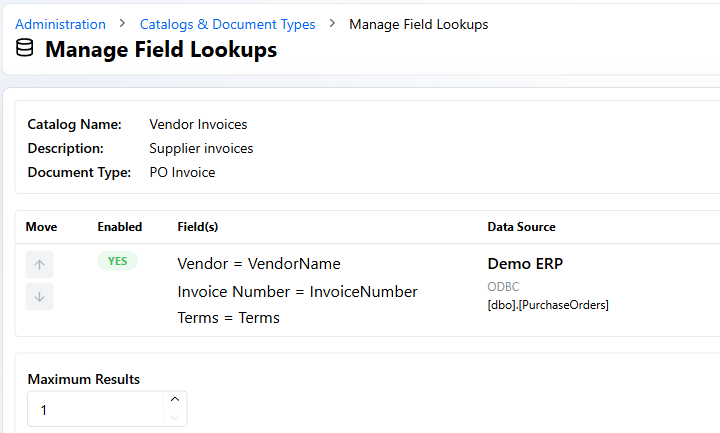
On the same document type, click the Field-Lookup Integration tile and add a lookup that matches your system's PO column to the PO Number field. Map each column you want onto its field, such as vendor name onto Vendor. Look up field values from another system walks through the connection and the screen.
Leave Make available for workflow actions only off. The lookup then runs by itself right after the zone reads the PO.
Step 4: Capture the invoices
Bring invoices in with a folder capture job for this document type, set up in Catalog Manager on the server. On its Descriptor tab, choose Document Descriptor None (each file is one invoice) and Processing Type Image (so scanned pages are read), and check Bypass Coding Queue and send documents directly to Catalog. Invoices with Vendor still blank are held in the Coding Queue anyway. Email capture jobs work the same way.
Test it
Drop one invoice whose PO is in your system into the capture folder. After a minute or so, search for its PO number and open it.
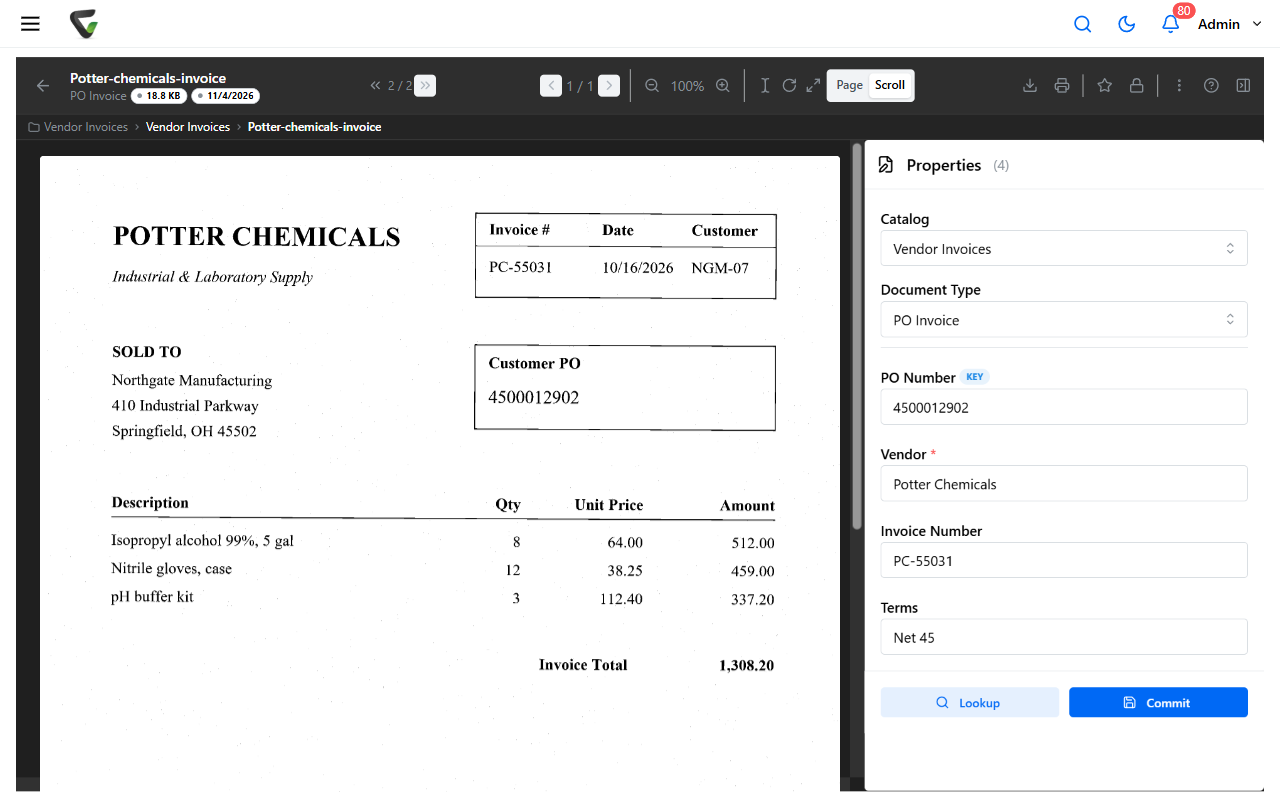
What you should see: the invoice is filed with PO Number and every mapped field filled in.
Things to know
| Situation | What to do |
|---|---|
| The PO field picks up the wrong number | Another number on the page matches your pattern too. Make the pattern stricter, such as more fixed digits at the start |
| A PO can have more than one invoice, such as partial shipments | The lookup fills from the first matching row, which may be a different invoice. Map the invoice number only if each PO has one invoice; otherwise find invoices by number with search |
| The invoice has no PO, or its PO isn't in your system yet | Once the PO exists, open the invoice in the Coding Queue, type or correct the PO, and click Lookup |
| A digit was misread | See Scan settings for accurate text reading |
Still stuck?
Contact support with one sample invoice, your PO pattern, and a screenshot of the zone and the lookup.