
Capture documents sent to an email address
Set up an email capture job in Catalog Manager so anything mailed to a dedicated address — vendor invoices, copier scans, e-faxes, partner paperwork — becomes a Content Central document automatically.
Before you begin
- Access to the Content Central server, where Catalog Manager runs
- A dedicated mailbox for capture (never a personal inbox) and its connection details from your mail administrator
- A document type already set up for the incoming documents
By the end of this guide, anything mailed to a dedicated address — invoices@yourcompany.com, scans@yourcompany.com — will flow into Content Central automatically, and you'll have proven it with a live test message.
Email capture is configured in Catalog Manager, a Windows application on the Content Central server — not in the web admin. Each capture job watches one mailbox and turns what arrives into documents.
Always use a mailbox created just for capture. Depending on the settings below, Content Central may delete every message in the mailbox after capturing it — never point a capture job at a personal or shared inbox.
Step 1: Create the capture job
On the Content Central server, open Catalog Manager.
Select your catalog in the list and click Modify.... In the Modify Catalog dialog, open the Capture tab.
What you should see: a Capture Jobs list with columns Name, Document Type, Source, Descriptor, and Enabled.
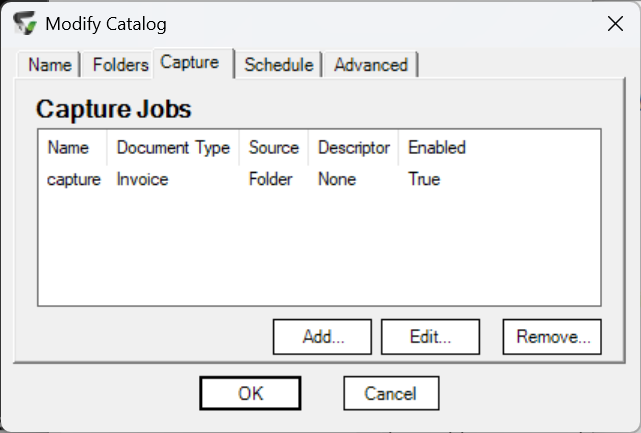
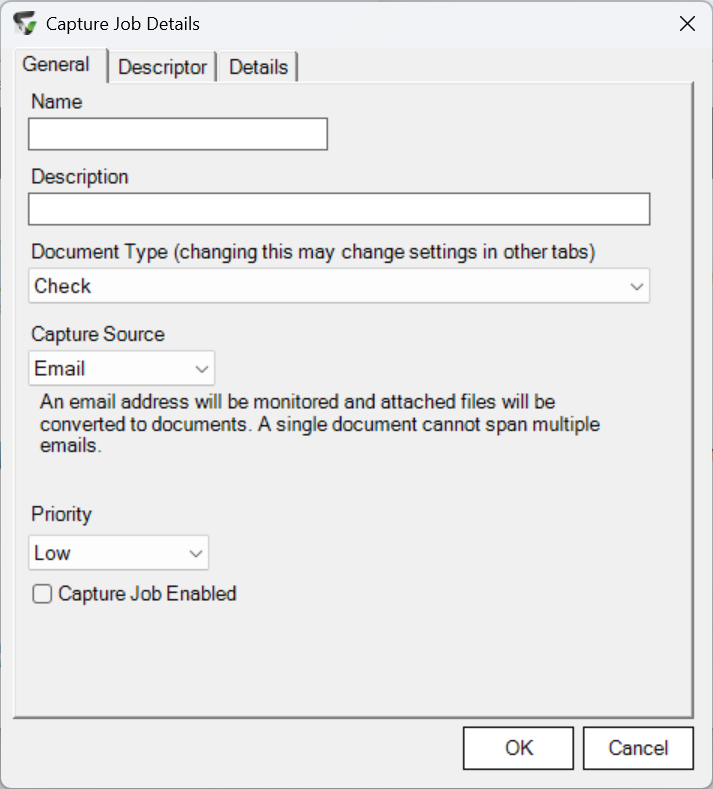
Click Add... to open the Capture Job Details dialog. On the General tab, enter a Name (like
AP Invoices - Email) and a short Description.
Choose the Document Type the incoming documents belong to. This decides which fields you can fill from the email and where the documents are routed — and changing it later may change settings on the other tabs.
Set Capture Source to
Email.What you should see: help text confirming an email address will be monitored and attached files converted to documents. A single document can't span multiple emails.
Pick a Priority (
High,Medium, orLow) and a Processing Type:Imagefor scans and PDFs that should go through OCR,Electronicto keep files exactly as sent. Leave Capture Job Enabled checked.
Step 2: Connect the mailbox
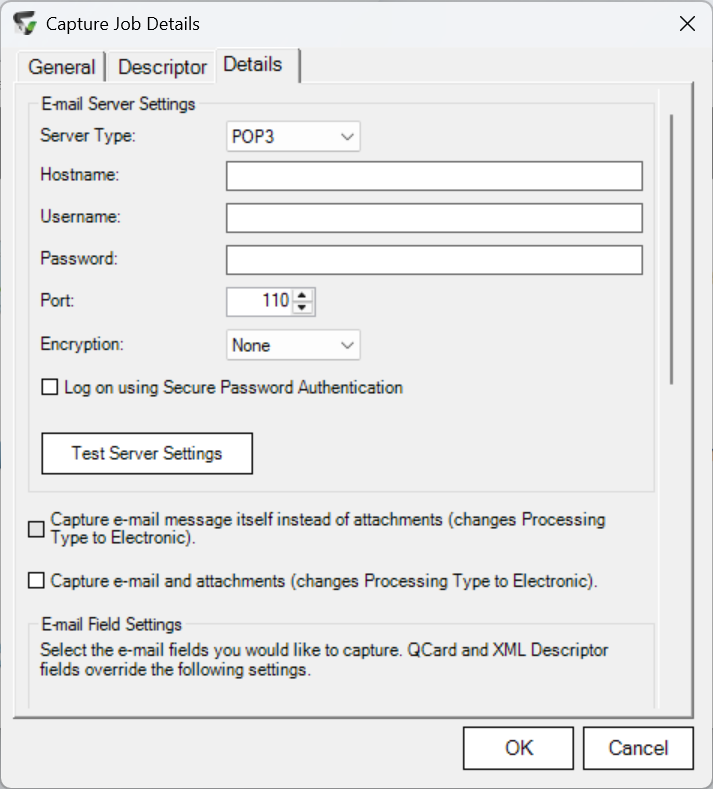
Open the Details tab. It has two sections: E-mail Server Settings and E-mail Field Settings.
Choose a Server Type: —
POP3,IMAP, orOAuth2.
For
POP3orIMAP, fill in Hostname:, Username:, and Password: from your mail administrator, and pick an Encryption: option. The Port: fills in automatically to match. Enable the POP3-only Log on using Secure Password Authentication checkbox only if your mail server requires it.Server Type Encryption NoneEncryption SSL/TLSPOP3 110995IMAP 143993
For
OAuth2, pick a Provider: —Azurefor Microsoft 365 (Directory Id:, Application Id:, Client Secret:, Username:) orGmail(Client Id:, Client Secret:, Username:). Your mail administrator creates these app credentials — they aren't the mailbox password. Each provider also has a Delete message after capturing: setting.
Click Test Server Settings.
What you should see:
Test Succeeded.plus a count of messages in the mailbox. A Gmail job can't be saved until this test passes.
A POP3 job downloads and deletes every message in the mailbox — Content Central makes you confirm I understand all messages will be deleted. before saving. This is why the mailbox must be dedicated.
IMAP jobs — and OAuth2 jobs with Delete message after capturing: unchecked — capture only unread messages, then mark them read and leave them in place. If someone opens a message before capture gets to it, that message is skipped.
There's no polling interval to set on this screen. The Capture Service on the server checks enabled jobs on its own schedule, so new mail is normally picked up within a few minutes.
Step 3: Choose what gets captured
By default, each file attachment becomes a document and the message body itself is not captured. Two checkboxes change that — they're mutually exclusive, and checking either one switches the job's Processing Type to Electronic:
- Capture e-mail message itself instead of attachments — stores the message as a
.emlfile named from its date and time. - Capture e-mail and attachments — stores the message and every attachment.
Inline images — signature logos, embedded pictures — are skipped automatically, so they never become junk documents. ZIP attachments are extracted into individual files unless the Processing Type is Electronic. Attachments from one email always stay together as that email's documents.
Under E-mail Field Settings, map email metadata — From, To, Cc, Date/Time, Subject, Body, and more — straight into the document type's fields, so documents arrive pre-coded. The ... button beside a field opens an advanced mapping dialog for extracting part of a value (an invoice number from the subject line, say). Preferred body format: chooses HTML or Plain Text for a mapped Body field.
If you capture both the message and its attachments, map the Content Type field — it's filled with Message or Attachment so users can tell the resulting documents apart.
Step 4: Route the documents
Captured documents that still need metadata land in the Coding Queue for the document type you chose in Step 1, where a person finishes coding them.
If your field mappings fill everything needed, open the Descriptor tab and check Bypass Coding Queue and send documents directly to Catalog to file documents with no human touch.
Save and close the dialogs. The new job appears in the Capture Jobs list with Enabled checked.
Once captured, these documents behave like any other capture: they go through the same processing pipeline and trigger the document type's workflow rules normally.
Step 5: Prove it works
Send one email with a single PDF attachment to the capture address.
Within a few minutes, open the Coding Queue for that document type in the web client (or the catalog itself, if you bypassed coding).
What you should see: the attachment as a new document, with any mapped email fields already filled in.
For a second confirmation, open the Event Viewer in the web client — it's in the menu behind your user avatar — and filter to capture events in that time window. The captured document appears as its own row.
Great uses for a capture address
| Address | Who mails it |
|---|---|
invoices@... | Vendors email invoices straight into your AP coding queue — no scanning, no forwarding. |
scans@... | Office copiers with scan-to-email send paper documents directly into Content Central. |
faxes@... | An e-fax service that delivers faxes as email attachments files them automatically. |
documents@... | External partners submit paperwork without needing Content Central accounts. |
The same idea powers integrations: anything that can send an email can feed Content Central, which is why the integration guides build on this setup.
Still stuck?
If the test email never appears, send support this compact evidence set:
- The capture job's Name and a screenshot of the Capture Jobs list showing it Enabled
- The test email's sender address, subject, and exact send time
- Whether Test Server Settings passes, and the message count it reports
- The Server Type, and whether messages are piling up unread (IMAP) or not disappearing (POP3)
- Any Content Central entries in the Windows Event Viewer on the server around the send time