
Recipe: ClickUp form uploads into Content Central
Wire a ClickUp form to Content Central with a Zap that e-mails each uploaded file to an e-mail capture job, so every submission's documents file themselves — one document per attachment.
Before you begin
- A dedicated inbox for capture, and access to the Catalog Manager application
- Administrator access to Content Central's web admin (for workflow)
- A ClickUp form that accepts file uploads, and a Zapier account that can send e-mail
By the end of this recipe, a ClickUp form submission with several attached files lands in Content Central as one document per file — captured by e-mail, pre-coded from the form's answers, and picked up by workflow — with nobody forwarding anything by hand.
Content Central never needs to know ClickUp exists, and ClickUp never needs to know Content Central exists. E-mail is the handshake; Zapier carries the mail.
The moving parts
| Part | Its job in this recipe |
|---|---|
| ClickUp form | Accepts the submission and its attached files; creates a task |
| Zapier (the Zap) | Watches for the new task, then e-mails each attachment to Content Central |
| E-mail capture job | Monitors the inbox and turns each attached file into a document |
| Workflow rules | React when each document arrives — notify, set fields, or assign it |
Build it right to left: Content Central first, then the Zap, then a test submission.
Step 1: The e-mail capture job (Content Central side)
E-mail capture jobs are configured in the Catalog Manager application. The full setup walkthrough is in Capture documents sent to e-mail; here is the shape of it, plus the settings this recipe cares about.
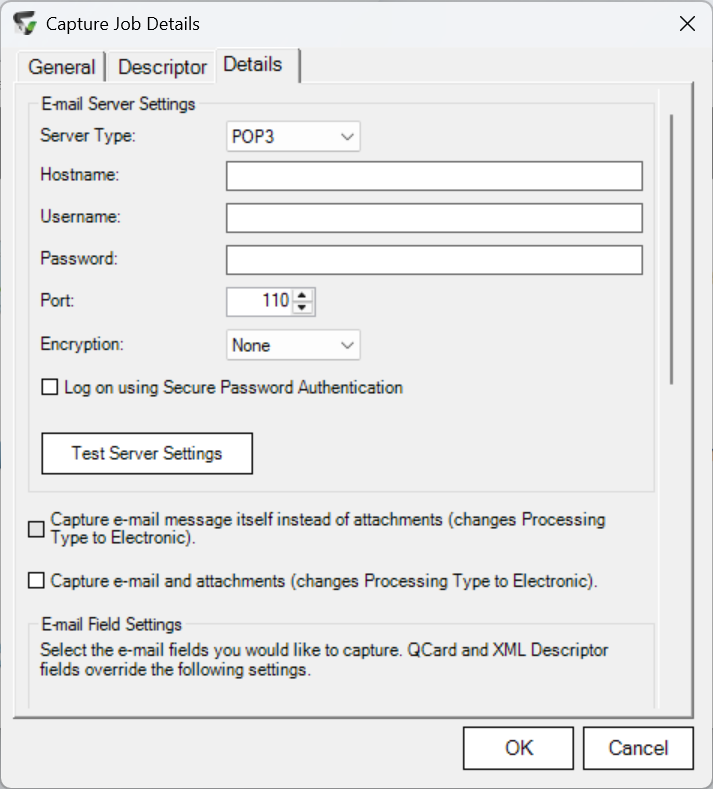
In Catalog Manager, select your catalog, click Modify..., and open the Capture tab. Click Add... to open the Capture Job Details dialog.
Name the job, pick the Document Type the uploads should become, and set Capture Source to Email. Leave Document Descriptor on
None.
In E-mail Server Settings, enter the dedicated inbox's connection details (Server Type is
POP3,IMAP, orOAuth2) and click Test Server Settings until it passes.
Leave both Capture e-mail message itself instead of attachments and Capture e-mail and attachments unchecked. You want the attached files only, not the e-mail wrapper.
In E-mail Field Settings, map Subject: to a field on your document type. Whatever the Zap puts in the subject line arrives pre-filled in that field at coding time.
Choose the routing path. Leave Bypass Coding Queue and send documents directly to Catalog unchecked to send every document to the Coding Queue for indexing, or check it to file documents straight into the catalog by document type.
Confirm Capture Job Enabled is checked and Disable Workflow Processing is not — Step 2 depends on it.
One e-mail carrying several attachments already becomes several documents — a job set up as above never merges them, and a document can never span two e-mails.
Even with Bypass checked, a document whose required fields are still empty diverts to the Coding Queue anyway. That's a safety net, not a bug.
Step 2: The workflow that greets arrivals (Content Central side)
Open the workflow rules where they're defined — global rules under Admin > Workflow, or the Workflow area of the catalog or document type — and create a trigger. Use the Coding-Queue Arrival trigger type if Step 1 routes to the queue, or Content Capture if documents file directly.
Set Source Evaluation: to No-Descriptor Capture Job so the rule fires only for these arrivals. There is no "Email" source option — a
None-descriptor e-mail job fires under that source. Format Evaluation: can narrow it further to certain file extensions.
Pair the trigger with actions in a workflow rule: send a notification from a message template, set or look up field values on the queue item, move or reclassify a filed document, or assign it to someone's work queue.
The queue-or-catalog decision was already made by the capture job in Step 1. Workflow doesn't choose the path — it automates what happens next on whichever path you chose.
Step 3: The Zap (the glue)
Zapier's screens change too often to document click by click, and you don't need them documented — the Zap has exactly two halves:
- Trigger: a new task (or new attachment) in the ClickUp space your form feeds.
- Action: send an outbound e-mail to your capture inbox address with the file attached.
Configure it to send one e-mail per attachment, and build each subject line from the form's answers — submitter, request type, and which file this one is.
One-per-e-mail isn't about keeping documents separate — Content Central splits multi-attachment e-mails on its own. It's about metadata: every attachment in one e-mail shares the same subject, so separate e-mails are how each document gets its own subject — and its own pre-filled field value.
Attach the files; don't embed them in the message body. Embedded inline images (like signature logos) may be skipped by capture.
Step 4: Test with a two-attachment submission
Submit the ClickUp form with two files attached — two small PDFs work well.
Give it a moment. The capture service polls continuously, but allow up to a couple of minutes for the e-mails to arrive and process.
Check the destination from Step 1 — the Coding Queue, or the catalog folder if you bypassed it.
What you should see: two separate documents — one per attached file — each with the mapped subject field pre-filled with that file's form answers.
Coding Queue showing two new items from one form submission, with the subject field pre-filled
Re-sending a test? POP3 jobs delete each message after capture, but IMAP jobs — and OAuth2 jobs not set to delete after capturing — only pick up unread messages. A re-sent test must land in the inbox unread.
If both documents arrived and the subject field carries the answers, the recipe works. Commit the queue items and confirm the Step 2 actions fired.
Troubleshooting
| Symptom | Likely cause and fix |
|---|---|
| Nothing arrived | Take the Zap out of the picture: send a plain e-mail with an attachment directly to the capture address. If it doesn't appear either, it's the capture job — recheck Test Server Settings, Capture Job Enabled, and (IMAP/OAuth2) that the message is unread. If it does appear, the Zap isn't sending. |
| One document instead of two | The job is capturing the e-mail message itself (you'll find one e-mail-format document instead of your files), or its Document Descriptor isn't None. A None-descriptor, attachments-only job never combines files. |
| Documents arrive with empty fields | Coding happens in Content Central, not ClickUp. Map Subject: in E-mail Field Settings and put the answers in the subject line — form data doesn't cross over any other way in this recipe. |
| Documents arrive but workflow stays silent | Disable Workflow Processing is checked on the job, or the trigger's Source Evaluation: doesn't include No-Descriptor Capture Job. |
| Filed directly when you wanted the queue (or vice versa) | The Bypass Coding Queue and send documents directly to Catalog checkbox decides the path — and empty required fields force the queue regardless. |
Still stuck after the direct-e-mail test? Send support the capture job's name, its Server Type, the timestamp and subject of one test e-mail, and whether Test Server Settings passes.
Swap the ends
Nothing in Steps 1–2 is ClickUp-specific. The Content Central half is a standing intake door, and any form tool or app Zapier reaches becomes a source the moment its Zap can send an e-mail with an attachment. Swap either end — the recipe holds.