
Serve Content Central over HTTPS: install or renew your SSL certificate
Renew an expiring certificate in two steps, or move an HTTP site to HTTPS properly — including the two Content Central settings that won't update themselves.
Before you begin
- Administrator access to the Content Central server
- Your certificate from the certificate authority (typically a .pfx file with its password)
At the end of this guide your Content Central site is served over HTTPS with a current certificate — and, if you're moving from HTTP for the first time, the emailed links and scanning workstations that quietly depend on the site's address keep working too.
Which job is this?
- Renewing a certificate (same site address, new certificate): steps 1–2. Ten minutes.
- Moving the site from HTTP to HTTPS for the first time: steps 1–5. The extra steps exist because two things remember your old address and won't update themselves.
Renew before the expiry date. Once a site has been served over HTTPS, browsers refuse to fall back to plain HTTP for that address for a full year — so an expired certificate doesn't degrade gracefully; it blocks every user with a security error they cannot click past. Treat the renewal date like an outage date.
Step 1: Install the certificate on the server
On the Content Central server, open IIS Manager.
Select the server node, open Server Certificates, and use Import to load your
.pfxfile (you'll need its password).
What you should see: the certificate appears in the list with the new expiration date.
Step 2: Bind it to the site
In IIS Manager, select the website that hosts Content Central and open Bindings.
Renewing: edit the existing https binding and select the new certificate. First time: click Add, choose type https, port 443, and select the certificate.
Browse to
https://your-server/ContentCentraland confirm the padlock.
Renewals stop here. Upgrades won't undo this — the installer deliberately leaves your site's bindings alone.
Content Central serves browsers over whatever binding IIS gives it; there is no certificate setting inside the product itself. The remaining steps are about the places that store your site's address.
Step 3 (first move only): Update the server URL Content Central hands out
Content Central learned its own address the first time anyone opened the site — over HTTP. It keeps using that remembered address in the links it sends out: notification emails, shared documents, exported capture forms, report download links. Moving to HTTPS does not update it.
Go to Administration > System Settings and type
Server URLinto the settings search box.
Under Workflow Settings, set Server URL for workflow to your new address, for example
https://cc.example.com, and save.
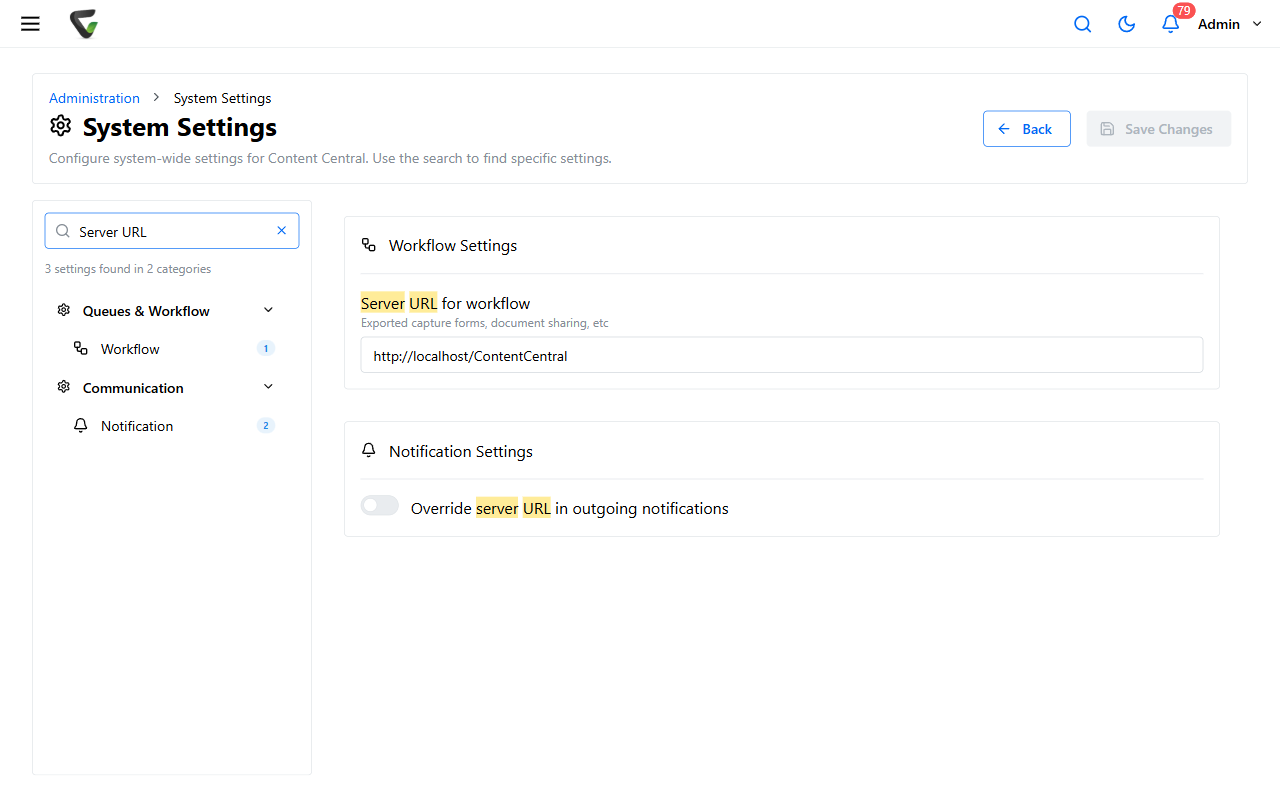
Trigger any notification email and confirm the link in it starts with
https://.
If your site runs on a port other than 443, contact support before changing this setting — non-default ports need special handling here, and a wrong value means every emailed link points somewhere broken.
Step 4 (first move only): Re-approve DirectScan on scanning workstations
The DirectScan agent on each scanning workstation trusts your site by its exact address — and https://cc.example.com is a different address than http://cc.example.com. After the move, scanning pages will show "has not been allowed to work with this site."
The fix is the same as first-time setup: on each scanning workstation, open Capture New > DirectScan on the (now HTTPS) site and click Install DirectScan — the installer downloaded from your own server carries the new address and approves it automatically.
Rolling out to many workstations? IT can deploy the agent silently with the new address pre-approved — contact support for the deployment package instructions.
Step 5 (first move only): If you use single sign-on
Your identity provider (Okta, Entra ID, ADFS) has your site's URLs in its configuration. Update them to the https:// versions, then test one SSO login. If SSO breaks only after the HTTPS move, that mismatch is the first thing to check.
If the site won't load afterward
Work through The login page won't open — and have ready: your certificate's issuer and expiry date, the exact browser error text, and whether HTTP worked immediately before the change.