
Configure outgoing email
Connect Content Central to your mail system — classic SMTP or OAuth2 for Microsoft 365 and Google Workspace — so notifications, approvals, and the E-mail document action all work, with the test that proves it.
Before you begin
- Administrator access to Content Central
- Your mail details — an SMTP host and credentials, or a Microsoft 365 / Google Workspace app registration
At the end of this guide Content Central can send mail — workflow notifications, approval requests, and the E-mail document action — through plain SMTP or through OAuth2 with Microsoft 365 or Google Workspace, and you'll have proven it with a real delivered message.
One symptom is worth knowing before you start: when outgoing email isn't configured, Content Central doesn't complain — the E-mail action simply doesn't appear in document menus, with no message explaining why. If users report that "the email button is missing," this page is the fix.
Where it lives
Administration > System Settings, then E-mail Server in the Communication group of the left sidebar (the panel heading reads E-mail Server Settings). System Settings requires a full administrator account — there's no narrower permission that grants it.
Changes collect on the page — an Unsaved changes banner appears — and nothing takes effect until you click Save Changes.
Set the sending identity
At the top of the category:
From name (i.e. Content Central) — the display name recipients see.
From address (i.e. noreply@corp.com) — the sending address. Use one your mail provider allows this account to send as.
Always use "From address" above, overriding user's e-mail address — with this on, everything sends from the one address above; with it off, mail a user initiates can go out under that user's own address, which some providers refuse. When in doubt, turn it on.
Then pick the Outgoing mail server type: SMTP or OAuth2. The Username (if required) field just below serves both paths — it's the account Content Central signs in as.
Path A — SMTP
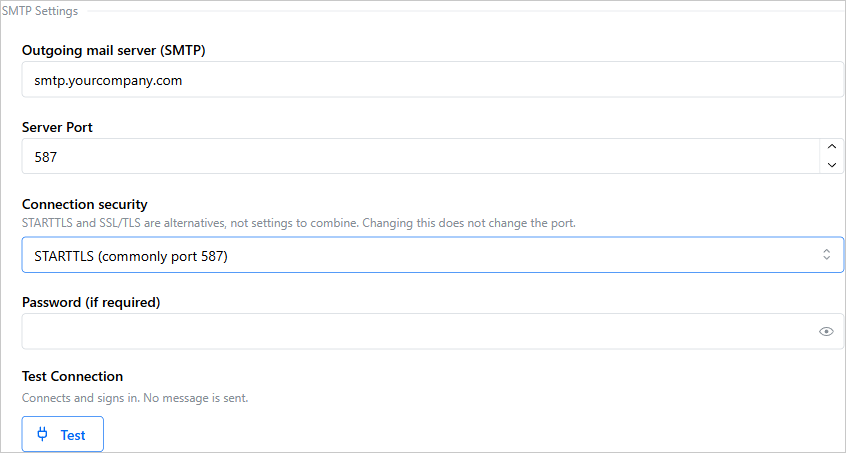
Enter the Outgoing mail server (SMTP) — your provider's server name, like
smtp.example.com.
Pair Server Port with Connection security. The setting's own description says it best: "STARTTLS and SSL/TLS are alternatives, not settings to combine. Changing this does not change the port."
Server Port Connection security 587STARTTLS (commonly port 587) 465SSL/TLS (commonly port 465) 25None — only if your mail server requires unencrypted
Fill in Username (if required) and Password (if required) if your server wants authentication (almost all do).
Click Test in the Test Connection row — "Connects and signs in. No message is sent." The test uses the values currently on the form, even unsaved ones. A failure offers a Show details disclosure with the raw diagnostics — that text is exactly what your mail administrator will ask for.
Path B — OAuth2 (Microsoft 365 or Google Workspace)
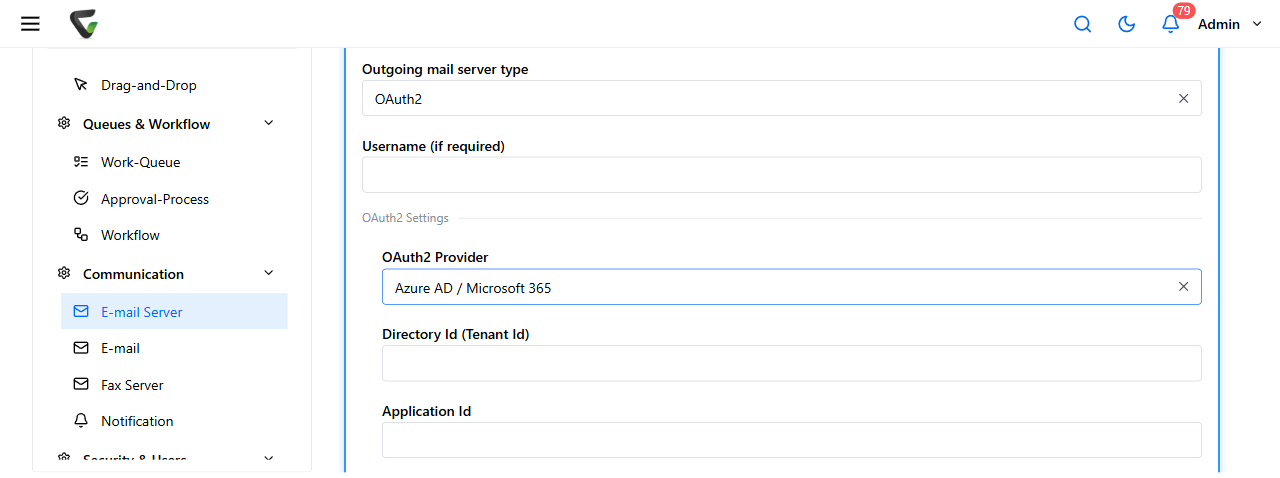
Set Outgoing mail server type to OAuth2, then choose the OAuth2 Provider: Azure AD / Microsoft 365 or Google Workspace. The SMTP fields no longer apply — each provider shows its own small set.
Microsoft 365
Fill in Directory Id (Tenant Id), Application Id, and Client Secret from your Entra app registration, and put the sending mailbox's address in Username (if required).
noteThese are the same four values the email capture side uses. If you've already registered an app for capture from Microsoft 365, you can reuse that registration — the values just have to be entered here as well, since the two settings are stored separately. That article also walks through creating the registration from scratch.
Click Test. Success reads "Test succeeded!" with a count of messages in the mailbox — the test proves the credentials reach the mailbox; like the SMTP test, it sends nothing. There's no sign-in popup on this path.
Google Workspace
Fill in Client Id and Client Secret from your Google Cloud Console OAuth client, and the sending account in Username (if required).
The OAuth client's authorized redirect URI must be your server's address followed by
/Admin/AdminSystemSettingsGmailOAuth2.aspx— for examplehttps://docs.example.com/ContentCentral/Admin/AdminSystemSettingsGmailOAuth2.aspx. That page exists only to receive Google's response; you never browse to it yourself.
Click Test. This one is interactive: a Google consent window opens — sign in as the sending account and approve. Success reads "Test succeeded! Click Save to persist the new tokens."
Click Save Changes. The tokens from the consent step aren't stored until you do — a tested-but-unsaved page is still an unconfigured server.
Two Google-specific snags, both with on-screen fixes: if the window never opens, your browser blocked the popup — allow it and test again. If authorization fails with "Access denied" (HTTP 403), add google.com (or accounts.google.com) to Safe Referrer Domains under Security Settings, save, and test again — the page shows this exact advice before opening the popup.
Prove it end to end
Save Changes, then send something real — the connection test never sends a message, so only a delivered email proves the whole pipeline:
Open a document and use the E-mail action (its very presence in the menu confirms the settings saved), sending to yourself — or trigger any workflow notification with yourself as recipient.
Check your inbox and spam folder.
Success check: the message arrives, from the name and address you configured. If it doesn't, Notification emails aren't sending walks the five layers — connection, sign-in, trigger, template, delivery — in order.