
Create a capture form
Build a fillable PDF capture form that creates a document and its indexed, searchable metadata in one submission — the form's fields are the document's fields.
Before you begin
- Administrator access, or the Catalogs admin permission with admin access to the target document type
- A document type for the documents the form will create
- A fillable PDF form (AcroForm) made in any PDF editor
By the end of this guide you'll have a working capture form: a fillable PDF that, in one submission, creates a fully indexed document — every field the person filled in becomes searchable metadata on that document.
Why this isn't just a form builder
A capture form's fields map to the document type's fields by name (capitalization doesn't matter). When someone submits the form, Content Central does two things in a single step:
- Saves a PDF of the completed form as a new document in the catalog.
- Writes every field value as indexed metadata on that same document.
There is no separate indexing or coding step afterward — the form is the capture step. That's the difference between a capture form and an ordinary fill-in form.
Each capture form belongs to exactly one document type — that's why the form's fields are that document type's fields.
Step 1: Prepare the PDF
Build the form as a fillable PDF (an AcroForm) in your PDF editor of choice. One thing matters most: field names. Name each fillable field exactly like the document field it should feed — a PDF text box named Invoice Number fills the Invoice Number document field (matching is case-insensitive).
Don't worry about fields that don't exist in Content Central yet — the upload step creates them for you.
The PDF must be an AcroForm — the standard fillable-PDF format. Some older form designers produce XFA forms instead; Content Central rejects those unless you use the legacy processing style, which is best avoided for new forms because browser support for it is decreasing.
Step 2: Upload the form
Open the Administration menu and choose Catalogs & Document Types.
Select the catalog, then the document type, and click its Capture Forms module.
What you should see: a page titled Manage Capture Forms with a grid of forms (Name, Enabled, Description, Actions). With no forms yet, the grid reads
No capture forms exist in this document type.
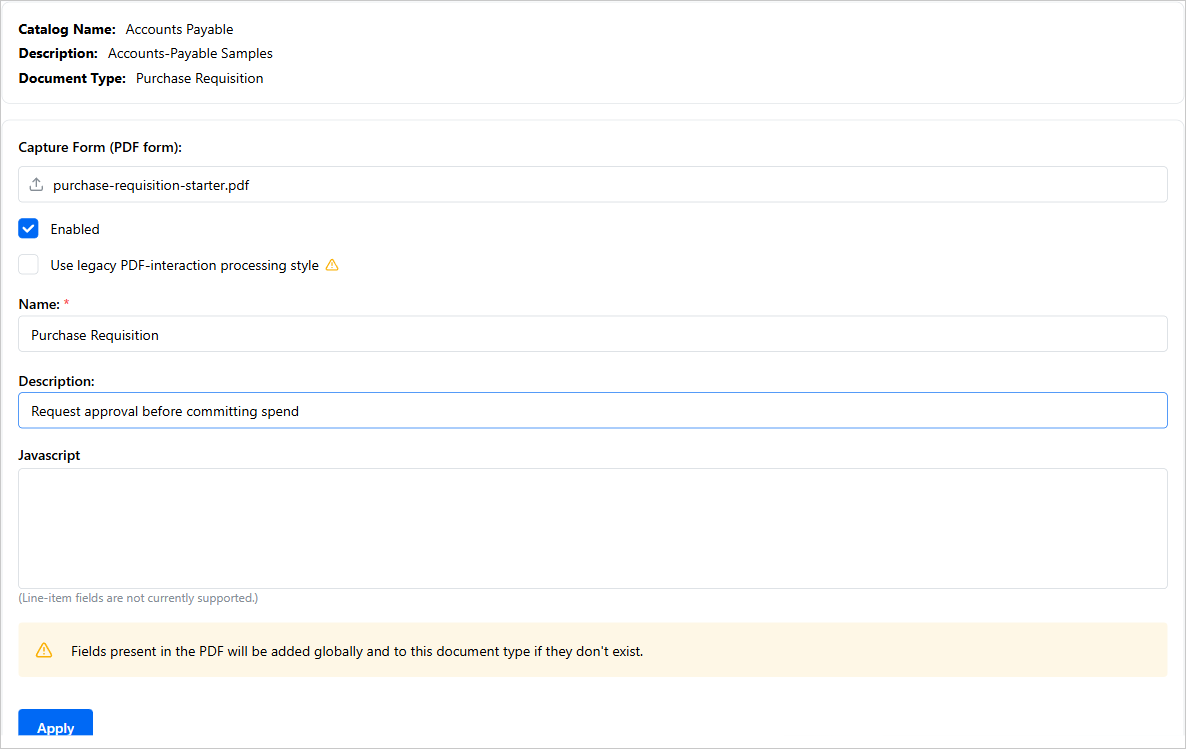
Click Add Capture Form. The Capture Form Details page opens.
Under Capture Form (PDF form):, click Select a PDF file and choose your PDF.
What you should see: the notice
Fields present in the PDF will be added globally and to this document type if they don't exist.That's expected — it's the automatic field import.
Name: auto-fills from the PDF filename; adjust it and add a Description: if you like. Check Enabled, then click Apply.
On save, Content Central reads the PDF's fillable fields and creates any that are missing, adding them to the document type: text boxes become Text fields, dropdowns and radio buttons become Text fields with the PDF's choices as an entry list, and checkboxes become Text fields with a Yes/No list.
On an empty Manage Capture Forms page you'll also see Create submit-ready forms from all PDFs. That's a separate, advanced mode that makes every PDF in the document type submittable — ignore it for this guide.
Step 3: Review the options
The defaults work for a first form. The ones worth knowing:
| Option | What it does |
|---|---|
| Submit Button: | Which button inside the PDF acts as its submit button (lists buttons found in your PDF). |
| Session Expiration: | How long an unfinished form session stays open (default 12 Hour). |
| Flatten PDF after first submission | Locks the stored PDF into a plain, non-fillable document after submission. |
| Allow revisions via submit button | Lets a user resubmit the form later to update the document. |
| Allow revisions from recipients of e-mails | Allows revisions from people who received the form by e-mail. |
Flatten PDF after first submission and the revision and field-update options are mutually exclusive — checking one side hides and clears the other. A flattened form can never sync with later metadata edits.
You can retrieve or swap the PDF later with the Download Capture Form and Replace Capture Form buttons on this page.
How the form and the metadata stay in sync
The stored PDF and the document's metadata don't drift apart:
- Metadata edits update the file. When someone commits changes to the document's properties in Content Central, the system re-renders the PDF from your form template with the updated values and saves it as a new major version of the document. (Forms using the legacy processing style behave differently: the existing PDF's fields are rewritten in place instead, only when Allow field updates from document-properties commits is checked — and never once the document has been digitally signed.)
- Resubmissions update the metadata. With Allow revisions via submit button on, a resubmitted form writes its values back to the document's fields and saves the file as a new major version. This is permission-gated: the submitter needs metadata-edit rights on the document type unless a system setting always allows capture-form field changes, and approval-process restrictions can still block individual fields.
Step 4: Test the form
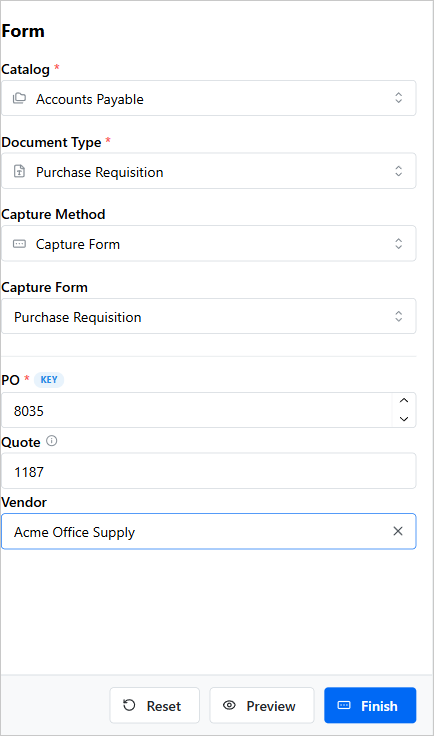
In the main navigation, open Capture New and choose Form.
Pick the document type, then pick your form in the Capture Form dropdown.
What you should see: the document type's fields appear in the field-entry panel. If the page says
No capture forms available for this document type., go back and confirm Enabled is checked.
Fill in the fields. Click PREVIEW to see the rendered PDF with your values in place, then click FINISH.
What you should see: the message
Document created from form.
Step 5: Confirm the document is indexed
The submission lands directly in the catalog as a finished, indexed document — it never waits in a coding queue. Its folder and file name follow the document type's Folder & File Building rules, and workflow runs as usual.
Run a field search — for example, a Power Search field condition matching a value you typed on the form.
What you should see: the new document, immediately. Field searches read the stored metadata directly, so there's no indexing delay.
Open the document's properties — every form field's value is there as document metadata.
Full-text keyword search is different: it relies on the catalog's search index, which a background service updates on its own schedule. If a keyword search doesn't find the brand-new document yet, that's normal — the field values are already searchable.
If the document type uses an auto-increment numeric field, simultaneous submissions are safe: when a number is already taken, the server substitutes the next available one and advances the sequence for the next form.
Still stuck?
If a submission fails or the document doesn't look right, first check permissions — submitting requires permission to add documents of that document type, and the submit is rejected otherwise. Then send support:
- The catalog name, document type, and capture form name
- A screenshot of the Capture Form Details page with its options visible
- The exact message shown after clicking FINISH
- One example: the field values submitted and the date and time