
Move Content Central to a new server
Copy your documents, restore your database, and let the Migration Assistant re-point, rebuild, and verify everything — a complete walkthrough.
Before you begin
- Read: What to know before moving Content Central to a new server
- New Windows server with IIS, and SQL Server the same version or newer
- Migration Assistant installer (from Ademero support)
- A maintenance window
At the end of this guide, Content Central runs on your new server with every document, user, and workflow intact — verified by an automated check, with the old server preserved as your rollback.
The heavy lifting is done by the Migration Assistant, which restores your database, re-points everything stored inside it, rebuilds search where needed, and then proves the migration worked by spot-checking real documents on disk. You do the file copying; it does the surgery.
Haven't read What to know before moving Content Central? Start there — especially the "keep the same folder paths" decision, which makes this whole process shorter.
Part 1 — Prepare the new server
Install Content Central on the new server using the current stable installer: dl.ademero.com/ccinstall.exe. You do not need to match the old server's version — the Migration Assistant restores an older database onto a newer build. Let the installer finish completely; it creates a fresh, empty database that your restored data will replace.
noteIf the old server runs a version before 7.8, read the two "older version" sections of Upgrade Content Central first — they cover the one-time online activation and the 7.8 changes you'll meet on the new server.
Open the Configuration Manager (Start menu > Ademero) on the new server, select the SQL Server instance that will host your database, and confirm both Test Admin and Test User pass.
importantThe Migration Assistant uses exactly these connection settings. If the tests fail here, every stage of the Assistant fails too — fix this first.
Install the Migration Assistant (provided by Ademero support) on the new server. When it asks for administrator permission, answer Yes — it needs it to manage services and check folder permissions.
Part 2 — Back up the old server
On the old server, stop Content Central: stop all five Content Central services and the website in IIS. Stopping first guarantees your database backup and your file copy agree with each other.
Services list on the old server showing the five Content Central services (Capture, Catalog, Workflow, Integration, Health) selected with Stop highlighted.
Make a full backup of the database — see Back up your Content Central database — and copy the
.bakfile to the new server.
Part 3 — Copy the folders
On the new server, copy the Content Central folders across. In an administrator Command Prompt (adjust the server name):
robocopy "\\OLDSERVER\C$\ProgramData\Ademero\Content Central" ^ "C:\ProgramData\Ademero\Content Central" ^ /E /COPY:DAT /DCOPY:DAT /MT:16 /R:2 /W:2 /XJ ^ /XF ConnectionInfo.xml /LOG:C:\Migration\copy.log- Keep
ConnectionInfo.xmlexcluded (the/XFabove) — the new server's own copy points at the new SQL Server and must not be overwritten. - If documents live anywhere else (like
E:\CCDocuments), repeat for each folder — same path on both sides whenever possible.
- Keep
Check the bottom of the copy log: FAILED must be 0. Re-running the same command is safe — it skips what already copied and fills in anything missed.
Grant permissions on every copied top-level folder: Modify for NETWORK SERVICE and Administrators, applied to all subfolders and files. (The Assistant's final stage verifies this, so a miss here gets caught — but doing it now saves a round trip.)
importantFile copies do not bring Windows permissions with them. Skipping this step is the single most common cause of "access denied" and "file is locked" errors after a migration.
Part 4 — Run the Migration Assistant
The Assistant walks seven stages in order. Two safety features to understand before you start:
- Dry run (preview only) is checked by default — while checked, nothing is ever written. Run each stage in dry-run first, read the result, then clear the box and run again for real.
- Not everything needs to be green. "(not set)" folders (features you never used), "not found" for old paths you're deliberately changing, and the license warning near the end are all normal. Only a red [X] marker blocks you.
Stage 1 — Restore. Browse to your
.bakfile, click Read header to confirm it contains your database, and run. If a checkbox offers to update ConnectionInfo.xml to the restored database, leave it checked — skipping it is the most common cause of a confusing migration. If it reports the database "already exists," tick the drop/replace option: the freshly installed database is empty and safe to replace.importantIf the old server ran an older version than you just installed, open the Configuration Manager now and click Create/Update Database so the restored database matches the new software — the same step an in-place upgrade needs. Then continue with Stage 2.
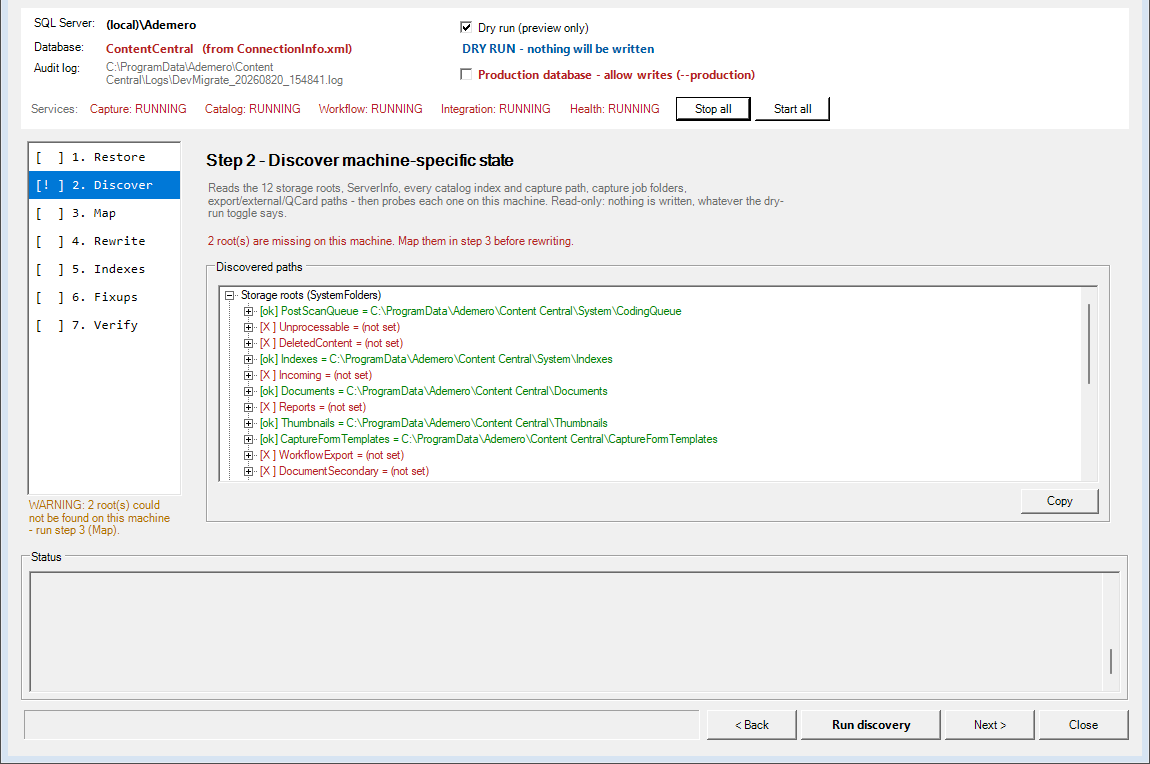
Stage 2 — Discover. Click Run discovery. It reads every folder location your database knows and checks each one on this server — read-only, changes nothing. If you copied to identical paths, you'll see the Same paths detected banner: the best outcome, and Stages 3 and 4 will skip themselves. "Not found" for folders you haven't copied yet means: finish Part 3, run discovery again.
Stage 3 — Map (only when paths changed). Click Add folder…, select the folder you copied everything into, then Suggest — the Assistant pairs each old location with its new home. Review the pairs; the validation panel must be clean before Stage 4 unlocks.
Stage 4 — Rewrite (only when paths changed). Preview in dry-run: the table shows exactly how many records each mapping will update, with before/after samples. When it looks right, clear Dry run and apply. The rewrite takes its own database backup first and runs as all-or-nothing — any error rolls everything back untouched.
Stage 5 — Indexes. Confirm the index folder box points at your copied
...\System\Indexesfolder and run. The Assistant re-points each catalog's search index and, if paths changed, queues a full search rebuild of every catalog (the index files themselves remember old paths). Click Start services now when offered — rebuilds only progress while services run.noteWhile rebuilds run, a "Search is DEGRADED" banner is informational: search results are incomplete until the rebuild finishes, but every document stays fully accessible the whole time.
Stage 6 — Fixups. Run the checks. If your server name or URL changed, enter the new address so links in notification emails keep working. The license warning always appears here — the license is tied to the old server's hardware. Re-activate with your license key (the message shows exactly how); if activation says the seat is in use, contact Ademero support to release the old server.
Stage 7 — Verify. The final exam: it pulls a random sample of documents straight from the database and confirms each file exists on disk, checks write permission on every storage folder, and cross-checks each catalog's search index. Run it after the index rebuilds finish. It's read-only — run it as many times as you like.
Part 5 — Finish up
Start all services (if not already), let index rebuilds complete, then click Resume schedules and restart the Catalog service.
Use the system like a user: open a handful of documents old and new, search in each catalog, upload a test document, and confirm an email notification arrives.
Neutralize the old server: stop its Content Central services, set them to Disabled, stop its website in IIS — and leave everything installed. Retire it for real only after a comfortable period on the new server.
You're done when Stage 7 passes and your own spot-checks feel normal. Keep the Migration Assistant installed — its Verify stage is a useful health check any time.
If something's wrong
Every run writes a detailed log (the exact path is shown in the Assistant's header). Start with Troubleshooting a Content Central migration; if you contact Ademero support, attach the newest log — it records every action and decision, so support can see precisely what happened without a screen share.